homemenubutton2aboutmenubutton2recipemenubutton2journeysmenubutton2linksmenubutton2contactmenubutton3
Showing posts with label bread. Show all posts

Wednesday, May 29, 2013

Gluten Free Traditions, Monkey Bread and Peach Muffins

Food can be such an emotional thing, often being attached to meaningful family traditions. If the majority of your family can eat gluten, it can be especially tricky when it comes to those traditions. If your family has traditions that involve gluten-filled foods you can’t eat, it’s important for you to figure out a gluten-free alternative, so you don’t feel left out.

These days, many gluten-filled products have a gluten-free alternative that you can just buy. And for those that don’t, you can either make your own or make something else just as good (or better). Stay positive about it. Remember the delicious foods you CAN have and be grateful for those. More importantly, focus on how great you feel when you don’t eat gluten. There are so many people who constantly feel awful and don’t know why. You do. Be happy about that. Choose to dwell on the positive in your life instead of dwelling on what you can’t have (easier said than done sometimes, I know, but the more you do it, the better you’ll get at it). 

One of my family’s traditions is having “monkey bread” (although we called it butterscotch pull-a-parts until in-laws came in and called it monkey bread) for breakfast every six months before we watch LDS General Conference on Sunday morning. That stuff is good! But it’s definitely not gluten-free.

Luckily for me, I have an amazing mom who is great at creating wonderful gluten-free alternatives for me and my sister.

She’s used the Glutino muffin mix for the past few years (actually, it was just the Gluten Free Pantry when she first started using it for this, but now it’s officially Glutino on the box) and it’s always been yummy, but she perfected it this last time.muffins_us

Unfortunately, she makes it up as she goes, so when I asked her for the recipe she wasn’t completely sure what she did. Here’s what she said:

I think I just put chopped pecans and dry butterscotch pudding mix (NOT instant) in the cupcake papers.  I'm not sure the amounts I used of butter/brown sugar/cinnamon.....possible 1/2 c butter, 1/2 c brown sugar, 1 t cinnamon.  Melt butter, mix in brown sugar and cinnamon, pour some into cupcake papers, add muffin dough.  I think it also takes a bit longer to bake because of the extra butter in it....maybe 15 minutes?

So sorry.  I really do make it up as I go.  It did seem extra yummy this last time, so I hope this is correct.  I've done it before when I put the sauce in the middle and on top.  This still seemed the best.

Love you!
Mom
 

So we’re going to go with this:

Gluten Free Butterscotch “Monkey Bread” Muffins

Ingredients:

  • Glutino muffin mix
    • 6 Tbsp softened butter
    • 2 eggs
    • 1/2 tsp vanilla
    • 1 cup milk
  • 1/2 cup butter
  • 1/2 cup brown sugar
  • 1 tsp cinnamon
  • chopped pecans
  • dry butterscotch pudding mix (NOT instant)

Directions:

  • Preheat oven to 350 degrees and put cupcake liners in pan
  • Mix up Glutino muffin mix according to directions on box, set aside
  • Put chopped pecans on bottom of cupcake liner (however much you want… I like a good layer on the bottom)
  • Sprinkle thin layer (or more if you want) of dry butterscotch pudding mix on bottom of cupcake liner
  • Melt butter, add brown sugar and cinnamon, then pour into cupcake liners
  • Add muffin batter
  • Bake 16-30 minutes (I know, I know… big difference between 16 and 30. It says 16 on the box, but we had to bake it longer when we did it because of the butter on the bottom. Test after 16 minutes and decide how much longer it needs.)

The muffins did this cool puffy thing that I can’t really describe. The yummy stuff on the bottom came up on the sides, the muffin puffed up really cool and it was just amazing!!! Sadly, I didn’t think to take any pictures. Next time…

I DO have pictures of some other yummy muffins I made:
IMG_8825

They’re these delicious things:

Glutino’s Peaches ‘n’ Cream Muffins

Ingredients

  • 2 cups Gluten Free Pantry Muffin and Scone Mix
  • 1/4 to 1/2 teaspoon ground allspice (or cinnamon)
  • 2 whole eggs, beaten slightly with a fork
  • 1/2 cup sour cream or yogurt
  • 3/8 cup whole milk (May need slightly more if using sour cream.)
  • 4 Tablespoons (1/2 stick) unsalted butter, melted
  • 1 teaspoon gluten-free vanilla extract
  • 1 heaping cup, peeled, diced peaches (about 2 medium peaches)

Directions

  1. Preheat oven to 350 degrees.
  2. Toss dry ingredients together in a large bowl.
  3. Stir wet ingredients together in a medium bowl.
  4. Pour wet mixture over dry ingredients and stir well to combine thoroughly.
  5. Fold in fresh peaches or use good quality canned peaches, well drained. Fresh nectarines may also be used.
  6. Spoon into lined muffin tins and bake at 350 degrees, 15-16 minutes.
  7. Or transfer to a lightly oiled 4x8-inch loaf pan and bake 35 to 45 minutes or until cake tester inserted in middle comes out clean.

Yield: 12 to 14 muffins or 1 loaf

IMG_8829

I love peaches!

I can’t wait till the peaches from Perry are ripe! I made these ones with canned peaches and they were good, but I will most definitely be making these with the fresh Perry peaches. YUM! (Those of you not in Utah, if you have a chance to come here at the end of the summer be sure to head to the Brigham City/Perry area to try their peaches. So good!)

And if you don’t love peaches or butterscotch, you can always try out some…

Chocolate Cherry Muffins
chocolate-cherry-muffins-4-300x263

or

Pumpkin Chocolate Chip Muffins
Photo by Maggie Kenny

Or perhaps some banana bread (recipe on the back of the box) or blueberry. Yum! Add in anything you want. Easy and delicious!

Enjoy!


What’s your favorite kind of muffin?

Thursday, January 31, 2013

Gluten Free “Cinnamon Roll” Tapioca Bread

One of my families favorite foods is Brazilian cheese bread. It’s so good and the recipe is really versatile. If you’ve been a long-time reader, you know I rarely deal with lots of crazy gluten free flours. I prefer to have one big bag of Grandpa’s Kitchen Gluten Free Flour mix (which already has the xantham gum mixed in) and some tapioca flour. I can basically make everything I care to make with those two things (I don’t do a ton of specialty gluten free treats. It costs more and it’s healthier to just stay away from all of the carbs and sugar anyway).

When I make something with the gluten free flour mix, I hoard it all for myself. Even though the mix I use is a good price as far as gluten free flours go, it’s still pricey enough that I don’t love to share it with people who don’t need gluten free. On the other hand, tapioca flour can be purchased in bulk and isn’t a bad price at all. Because of that, I gladly share the Brazilian cheese bread when I make it.

I love adding new spices to the cheese bread each time I make it. I’ll add extra garlic, try different cheese, put parsley in, and once made pizza ones with spinach, pizza seasonings and cut up pepperoni (we dipped them in pizza sauce).

Back at the beginning of September, when I was 8+ months pregnant with my cute little Emma, I craved carbs and sweets big time! I especially wanted a cinnamon roll. Problem was, I had run out of my GF flour and didn’t want to run to the store for more. I was making some of the cheese bread for dinner that night (great as a side for cheesy brocolli cauliflower soup) and I had an idea. Why not try to turn this recipe into a dessert recipe?

So I tried it, and it worked!

Now I’m not going to say that these are the most amazing dessert I’ve ever had and everyone should try them because they’re not. But I really enjoyed them and they fixed my craving.

I took a picture of my changes so I wouldn’t forget them:IMG_7135

Here’s what you do:

Gluten Free “Cinnamon Roll” Tapioca Bread

Ingredients:

  • 1/2 cup butter (1 stick)
  • 1/3 cup water
  • 1/3 cup milk 
  • 1/2 tsp salt
  • 2 cups tapioca flour
  • 2 T sugar
  • 1/2 T cinnamon
  • Optional: 2/3 cups pecans
  • 2 beaten eggs

Directions:

  1. Preheat oven to 375 degrees
  2. Pour butter, water, milk, and salt into a large saucepan, and place over high heat. When the mixture comes to a boil, remove from heat immediately, and stir in tapioca flour, sugar and cinnamon until smooth. Set aside to rest for 10 to 15 minutes.
  3. Stir the nuts and eggs into the tapioca mixture until well combined, the mixture will be chunky like cottage cheese. Drop rounded balls of mixture onto an ungreased baking sheet (any size you want, from popper size to cookie size).
  4. Bake until tops are lightly browned, 15-20 minutes.

Ready to bake:

IMG_7136

All done:IMG_7142IMG_7143

Of course, they need icing to truly make them like cinnamon rolls. I found this icing recipe from allrecipes to dip them in.

Icing

Ingredients:

  • 1/2 (8 ounce) package cream cheese, softened

  • 1/4 cup butter, softened

  • 1 cup powdered sugar

  • 1/2 teaspoon vanilla extract

  • 1 1/2 teaspoons milk

  • Directions:

  • Stir together cream cheese, softened butter, confectioners' sugar, vanilla and milk.

  • I softened (aka melted) my butter a little too much, so it was more runny than frostingy, but I liked it that way. I dipped the “cinnamon rolls” in rather than frosting them. You can do either.

    IMG_7144

    Yummy and actually quite addicting!IMG_7145

    Now remember, these are made with tapioca flour. Brazilian cheese bread is supposed to have a rubbery texture inside and so these do, too. Make them smaller if you don’t love the rubbery texture on a dessert recipe like this. I don’t mind it. I thought they were really good!

    If you take this simple base recipe and a little creativity, you could come up with a lot of great new treats, savory or sweet!

    Base Recipe for Tapioca Bread

    Ingredients:

    • 1/2 cup butter (1 stick)
    • 1/3 cup water
    • 1/3 cup milk
    • 1/2-1 tsp salt (1/2 for sweet, 1 for savory)
    • 2 cups tapioca flour
    • seasonings of any kind
    • 2/3 cups something with substance (cheese, nuts, etc… depending on what you’re going for)
    • 2 beaten eggs

    I’m thinking I really need to try some sort of a pumpkin treat using this base recipe. Yum… pumpkin…

    I think I know what I’m going to do today. Smile

    Give this a try and let me know what you think! And if you come up with any other great recipes using this base recipe, be sure to let me know!

    Enjoy!

    P.S. Tapioca flour can be purchased in bulk at places like Winco and Whole Foods. If you’re worried about cross-contamination in the bins, ask the manager if you can get a new bag.


    Thursday, October 13, 2011

    Udi’s Gluten Free Foods: Info

    image

    I learned a lot from helping out with the Udi’s booth at the Gluten Free Expo.  I learned what peoples favorite Udi’s products are, what questions they asked the most, and what the answers to those questions were.  Here’s my list of the things that stood out most.  Feel free to ask any other questions you might have and I’ll do my best to answer (I love answering questions, so helping at a booth was perfect for me!).

    • Udi’s is pronounced “oo-dies.”  Before becoming a Udi’s Ambassador I said “you-dies” and realized about half the people at the expo did too.  So now you know how to say it :).  (It’s a man’s name, fyi.)
    • Udi’s is based out of Denver, Colorado. 
    • Most people’s favorite Udi’s products are the breads (obviously) and the bagels, though the muffins and hot dog buns also got a lot of talk.
    • Udi’s products can be found at most Smith’s, Whole Foods, other health food stores, Winco’s, and many Associated food stores (Macey’s, Harmons, etc.).  You can check the store locator for stores near you (they also have a locator to find restaurants that use Udi’s products).
    • Udi’s flash freezes their products right after baking them, then ships them frozen.  It’s up to the store manager whether or not they put them on the shelves or in the freezer section, so if you can’t find the products check both places (or just ask an employee).  
    • Udi’s products have a shelf life of 7 days before needing to either be eaten or frozen.  If your store displays them on the shelf then check the date to know how long you have (the store should have put it on the bag when they received the delivery).   
    • People have a hard time finding the hot dog buns.  Most seemed to have luck at Whole Foods. 
    • If there’s ever an Udi’s product you’d like to purchase, but the store doesn’t have it (like hot dog buns), ask the manager if they can start carrying it.  If they carry Udi’s products, they have the ability to order any of the products they want.
    • You can also ask stores that don’t carry Udi’s if they could start.  If they get enough interest hopefully they’ll start carrying it.
    • The cookies are not dairy free, but the rest of Udi’s products are (including the amazing double chocolate muffins).
    • Udi’s has a ton of delicious gluten free products and are always working on creating more.  Breads, bagels, pizza crust, muffins, cookies, granola, and hot dog/hamburger buns.  Multiple flavors of all. 
    • The newest bread is Millet-Chia.  It’s very tasty and has a lot of protein and fiber.  Good stuff.
    • People LOVE Udi’s products!  More than half of the people who came to the table shared some sort of personal story about Udi’s.  How they eat a muffin or bagel every morning for breakfast, how their family goes through at least 2 loaves of bread a week because they all love it, how they don’t know how they’d live without Udi’s…  Seriously.  People love it.  Most also thanked us, which made it a really fun booth to help out with. :) 

    So there you have it. If you haven’t tried Udi’s products yet trust me when I say you need to.  It is good stuff.  I like to keep a loaf of bread in my freezer, so that I can have my toast (with either pb&j or Nutella on it) and grilled cheese sandwiches whenever I want.  So good!   

    Tuesday, July 27, 2010

    Gluten Free Brazilian Cheese Bread (Pao de Queijo)

    My sister lives in Chile and always talks about these amazing cheese rolls she's always eating that she thought were gluten free. We tried to find a recipe for them, but weren't able to (I think we thought they were from Peru or something, so that's what I searched). Well, she was visiting Utah a few weeks ago and we went to Tucano's with our family (as much as I love this restaurant, I don't recommend eating there if cross-contamination is a concern for you- though I'm sure you could talk to the manager about getting some food that's fully gluten free if you wanted). Being the sweet sister she is, she asked a server if they had a list of what was gluten free. They brought out a list of things that did have gluten. Sadly, whatever garlic seasoning they use has it in it, but I was happy to see that their rolls were gluten free!

    That's when my sister realized that the cheese rolls she always talked about must be Brazilian and not Peruvian! She tasted them and confirmed that. They were delicious! Now that I knew what to search for I found some recipes for "Brazilian Cheese Bread" (or Pao de Queijo) and it turns out that it's a fairly simple recipe! There's only 1 ingredient I had to buy and that was tapioca flour. If you've read this blog for long, you know I don't like to buy lots of fancy flours, especially if they cost a lot. Well, tapioca flour is one of the cheaper flours, so I went for it. I found mine at Bountiful Nutrition for less than $4.

    I got the recipe here, along with the first picture (my picture at the bottom is with my cellphone because my camera died, so it's horrible).

    Gluten Free Brazilian Cheese Bread
    Ingredients:
    • 1/2 cup olive oil or butter
    • 1/3 cup water
    • 1/3 cup milk or soy milk
    • 1 tsp salt
    • 2 cups tapioca flour
    • 2 tsp minced garlic
    • 2/3 cup freshly grated Parmesan cheese (I used cheddar cheese)
    • 2 beaten eggs
    Directions:
    1. Preheat oven to 375 degrees
    2. Pour olive oil, water, milk, and salt into a large saucepan, and place over high heat. When the mixture comes to a boil, remove from heat immediately, and stir in tapioca flour and garlic until smooth. Set aside to rest for 10 to 15 minutes.
    3. Stir the cheese and egg into the tapioca mixture until well combined, the mixture will be chunky like cottage cheese. Drop rounded balls of mixture onto an ungreased baking sheet. (The original recipe calls for 1/4 cup sized balls. That's way too big. Make them into little popper sizes.)
    4. Bake until tops are lightly browned, 15-20 minutes.
    That's what the original recipe calls for. After making it once, this is what I'll do differently next time (I didn't have time to read the reviews before making it the first time):
    • I'll use butter instead of olive oil. There was a strong olive oil aftertaste with these.
    • I don't think I'll put the garlic in next time. It was delicious, but I guess the garlic isn't authentic to the actual Brazilian cheese bread.
    • I used a grated cheddar and mozzarella cheese blend because it's what I had. I will do the same thing next time based on the reviews.
    • I'm going to knead the dough a little bit and then roll the dough balls in my hands before cooking them. Mine were lumpy. Though still good, I'd like to try to make them smoother. I'll also make them smaller than the recipe called for.
    These are delicious (I took mine to recipe group and everyone loved them), easy, and gluten free. They are best fresh and leftovers should be eaten within a few days, so don't double the recipe unless you're making them for a lot of people. FYI, the inside texture will be a little rubbery. That's how they're supposed to be.

    Enjoy!

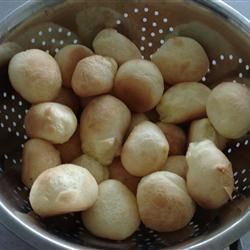
    This is how ugly mine turned out and they still tasted good.

    Friday, August 29, 2008

    Delicious bread

    I bought a GF bread mix awhile ago, planning to make it in a bread maker I inherited. I finally decided to figure out the bread maker yesterday (it actually ended up being very simple), but it turned out the mix was for a 2 lb. maker and mine was 1 1/2 lbs. Sadness.

    So I decided to make my husband some bread in the maker and make mine in the oven. They both turned out great, but I'm going to focus on mine since this is a gluten-free blog :).

    This is the mix:
    Pamela's Wheat-Free Bread Mix (don't worry, it's gluten-free too). I was a little skeptical about this mix because I'm not the biggest fan of some Pamela's already made cookies I tried, but it turned out to be very good.

    Tips on making it without a bread maker:

    Be sure to read the directions carefully and do exactly what they say. It's not hard, but you do have to put the ingredients into a liquid measuring cup just as it says to. Then use a big electric mixer to blend the ingredients.
    I don't have a bread pan I like, so I decided to make rolls. It was simple. You just put the dough into a muffin pan.
    Dough sitting for an hour to rise

    Finished product!

    I'm not kidding when I tell you these rolls are amazing (I took a bite out of one and then remembered I wanted a picture so I put it back)! They taste like normal, gluten-full rolls to me. I'm taking some to Paige tomorrow and I'll have her do a review of them too (especially since she's been GF for a shorter period than me).


    Buying the mix:
    I got this mix from Gregory's Wheat Shop in Bountiful for $5.25. I love this store! They sell a ton of GF products I haven't seen elsewhere and the price isn't terrible (for GF).

    I loved this mix and will be buying another one. I'm also going to try making GF bread without a mix in my bread maker using the cheapest ingredients possible. Ha! My guess is I'll enjoy it, but it won't be good enough to share. We'll see.